Usage
Running examples
Two examples come bundled along with the kanapy package. You can run them individually by navigating into the corresponding directory and executing them as shown:
$ cd kanapy/examples/
$ cd sphere_packing/
$ python sphere_pack.py
You can view the data generated by the simulation (after the simulation
is complete or during the simulation) by launching OVITO and reading in
the dump files generated by kanapy from the ../sphere_packing/dump_files/ directory.
The UI should look similar to this:
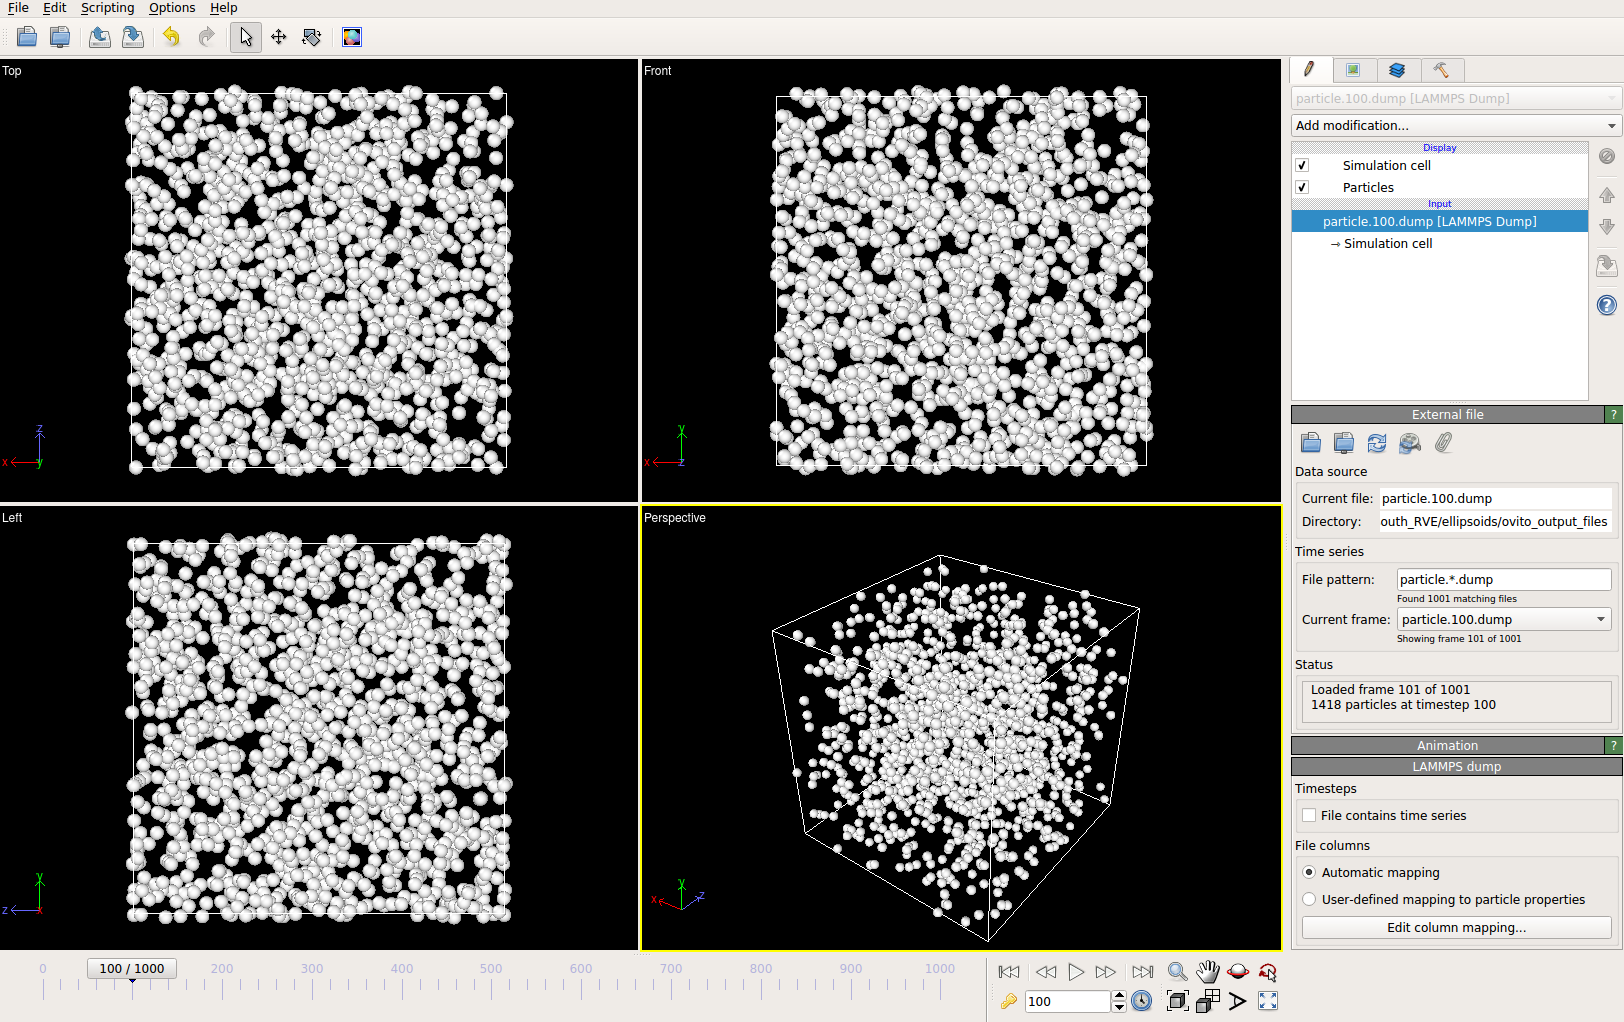
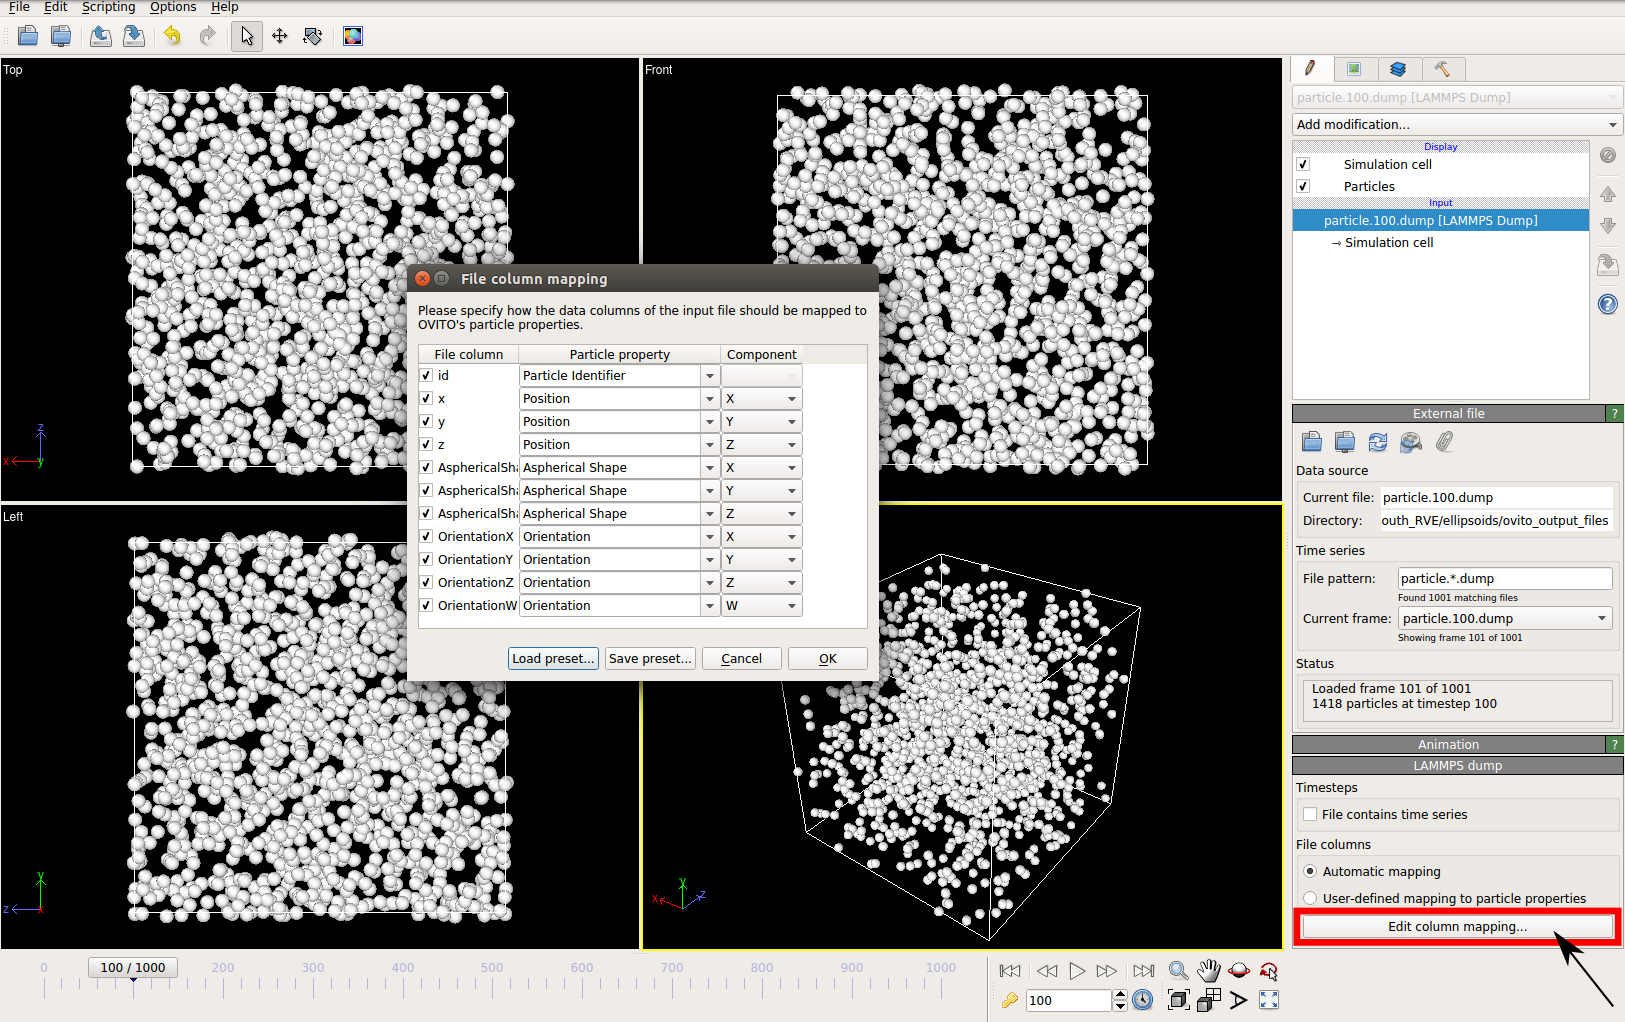
By default OVITO loads the particles as spheres, to change this option
to ellipsoids click on Edit column mapping option (at the bottom right corner of the GUI)
and assign the required particle properties and components as shown:
For further viewing customization refer to OVITO’s documentation.
Detailed tutorial
A detailed description of the default examples that come packaged with kanapy is presented here. The two examples sphere_packing and ellipsoid_packing depict the different workflows that has to be setup for generating synthetic microstructures with equiaxed and elongated grains respectively. Both these examples
contain an input file wherein the user can specify the statistical parameters required for the complete simulation. For a detailed understanding of the general framework of packing simulations please refer to: Modeling approach
Note
- New examples must be created in a separate directory under the
kanapy/examples/directory structure. It allows the various kanapy modules an easy access to the json and dump files created by kanapy. - The json and dump files help in making the various kanapy modules independent of one another during execution.
- The input file must always be named as:
stat_input.txtto be read by kanapy.
Input file structure
An exemplary structure of the input file: stat_input.txt is shown below:
It is built with the following keywords: @ Equivalent diameter, @ Aspect ratio, @ Orientation, @ RVE, @ Simulation.
- The keyword
@ Equivalent diametertakes in four arguments to generate a log-normal distribution for particle’s equivalent diameter, they are the Log-normal distribution’s standard deviation and mean, and the minimum and maximum cut-off values for the diameter.- The
@ Aspect ratiotakes only the mean value as input. If the resultant microstructure should contain equiaxed grains then this value should be set to 1.- The
@ Orientationkeyword represents the tilt angle of particles with respect to the positive x-axis. Hence, to generate a distribution it takes in two arguments: the normal distribution’s mean and the standard deviation.- The
@ RVEkeyword takes two inputs: the side length of the final RVE required and the number of voxels per RVE side length.- The
@ Simulationkeyword takes in two inputs: The total number of time steps and a boolean value for periodicity (True/False).
Note
- The user may choose not to use the built-in voxelization (meshing) routine for meshing the final RVE. Nevertheless, a value for voxel_per_side has to be provided.
- A good estimate for voxel_per_side value can be made by keeping the following in mind: Smallest dimension of the smallest ellipsoid/sphere should contain atleast 2 voxels.
- The nsteps value determines the growth of the particle during the simulation. At the start of the simulation all particles are initialized with null volume. And at each time step they grow in size by the value: diameter/nsteps. So naturally, the last timestep would contain particles in their actual size.
Example workflows
Sphere packing
This example demonstrates the workflow for generating synthetic microstructures with equiaxed grains. The principle involved in generating such microstructures are described in the sub-section Microstructure with equiaxed grains. With respect to the final RVE mesh, the user has the flexibility to choose between the in-built voxelization routine and external meshing softwares.
If external meshing is required then the positions and weights of the particles (spheres) after packing can be written out to be post-processed. Voronoi tessellation and meshing software Neper can be used to read the positions and weights for generating tessellations and FEM mesh. For more details refer to Neper’s documentation.
If the in-built voxelization routine is prefered, then the Module voxelization will generate hexahedral element (C3D8) mesh that can be read by commercial FEM software Abaqus.
Imports: This example requires the following imports from the python standard and kanapy modules.
import os
import sys
sys.path.append('../..')

import kanapy
from kanapy.input_output import particleStatGenerator
from kanapy.input_output import write_position_weights
from kanapy.packing import packingRoutine
The methods for generating particle distribution statistics and outputing particle
position and weights are imported from the input_output module. The routine
for the actual particle packing simulation is imported from the packing module.
Workflow: The complete process consists of 3 stages:
- Particle data generation.
- Particle packing simulation.
- Writing output files.
def main():
    inputFile = os.getcwd() + '/stat_input.txt'
    particleStatGenerator(inputFile)
    packingRoutine()
    write_position_weights(800)
    return

if __name__ == '__main__':
    main()
Note
- Individual stages can be run by commenting out the other stages but should be done sequentially.
- The
kanapy.input_output.particleStatGenerator()method requires thestat_input.txtas input. - The
kanapy.input_output.write_position_weights()method requires the simulation timestep as input. The choice of the timestep is very important. It is suggested to choose the time step at which the spheres are tightly packed and there is least amount of overlap. The remaining empty spaces will get assigned to the closest sphere when it is sent to the tessellation and meshing routine. Please refer to Microstructure with equiaxed grains for more details.
The data required for packing simulation contained in the user defined input file: stat_input.txt is read
by the method kanapy.input_output.particleStatGenerator(). It creates the necessary particle distribution
, RVE and simulation information and writes it to json files for future access of other methods. The method
kanapy.packing.packingRoutine() when called looks for the json files generated by kanapy.input_output.particleStatGenerator()
and reads the files for extracting information required for the packing simulation. At each time step of the
packing simulation the kanapy.packing.particle_grow() method will write out a dump file containing information
of particle positions and other attributes.
Finally, the kanapy.input_output.write_position_weights() method can be called
to write out the position and weights files required for further post-processing. This function takes in the timestep
value as an input parameter and reads the corresponding dump file generated previously. By extracting the particle’s
position and dimensions it creates the sphere_positions.txt & sphere_weights.txt files.
If the built-in voxelization is prefered then the kanapy.voxelization.voxelizationRoutine() method can be called
to generate the hexahedral mesh. This function also takes in the timestep value as an input parameter and reads the
corresponding dump file generated previously. The kanapy.input_output.write_abaqus_inp() method can be called to
write out Abaqus (.inp) input file. The workflow now looks like:
from kanapy.voxelization import voxelizationRoutine
from kanapy.input_output import write_abaqus_inp

def main():
    inputFile = os.getcwd() + '/stat_input.txt'
    particleStatGenerator(inputFile)
    packingRoutine()
    voxelizationRoutine(800)
    write_abaqus_inp()
    return

if __name__ == '__main__':
    main()
Storing information in json & dump files is effective in making the workflow stages independent of one another. But the sequence of the workflow is important, for example: Running the packing routine before the statistics generation is not advised as the packing routine would not have any input to work on. Both the json and dump files are human readable and hence they help the user debug the code in case of simulation problems. As mentioned earlier, the dump files can be read by visualization software OVITO, this provides the user a visual aid to understand the physics behind packing.
Ellipsoid packing
This example demonstrates the workflow for generating synthetic microstructures with elongated grains. The principle involved in generating such microstructures are described in the sub-section Microstructure with elongated grains. With respect to the final RVE mesh, the built-in voxelization routine has to be used due to the inavailability of anisotropic tessellation techniques. The Module voxelization will generate hexahedral element (C3D8) mesh that can be read by commercial FEM software Abaqus.
Imports: This example requires the following methods to be imported from kanapy modules.
import os
import sys
sys.path.append('../..')

import kanapy
from kanapy.input_output import particleStatGenerator
from kanapy.input_output import write_abaqus_inp
from kanapy.packing import packingRoutine
from kanapy.voxelization import voxelizationRoutine
The methods for generating particle distribution statistics and outputing Abaqus input file
are imported from the input_output module. The routine for the actual particle packing
simulation is imported from the packing module. And the routine for generating hexahedral mesh
is imported from voxelization module.
Workflow: The complete process consists of 4 stages:
- Particle data generation.
- Particle packing simulation.
- RVE voxelization.
- Writing output files.
def main():
    inputFile = os.getcwd() + '/stat_input.txt'
    particleStatGenerator(inputFile)
    packingRoutine()
    voxelizationRoutine(800)
    write_abaqus_inp()
    return

if __name__ == '__main__':
    main()
Note
- As mentioned previously, individual stages can be run by commenting out the other stages but should be done sequentially.
- The
kanapy.input_output.particleStatGenerator()method requires thestat_input.txtas input. - The
kanapy.voxelization.voxelizationRoutine()method requires the simulation timestep as input. The choice of the timestep is very important. It is suggested to choose the time step at which the ellipsoids are tightly packed and there is least amount of overlap. The remaining empty spaces will get assigned to the closest ellipsoid when it is sent to the voxelization (meshing) routine. Please refer to Microstructure with elongated grains for more details.
The process of the methods kanapy.input_output.particleStatGenerator() and kanapy.packing.packingRoutine()
is similar to that described in Sphere packing. But for voxelization the kanapy.voxelization.voxelizationRoutine()
method is called to generate the hexahedral mesh. It takes in the timestep value as an input parameter and reads the corresponding
dump file generated previously. By extracting the particle’s position and dimensions it creates the final FEM mesh. Finally,
the kanapy.input_output.write_abaqus_inp() method can be called to write out Abaqus (.inp) input file.